Customized notebook...;)
Remember in school, we'd always buy lots of exercise books, those single line notebooks and Buku Gapen. Those unused ones or only used a few pages.. Well don't throw them away! You can reuse them as diaries, or special occasion notebooks like book of Quotes or your Book of Ideas.. You can use it just for about anything or EVERYTHING. ;) It could even be an handmade gift for a friend.
I did this a couple of weeks ago, I was bored with school work so I found this old exercise book with some words scribbled inside and I decided to turn it into a diary! Just a clean, simple, nature inspired colour diary. Some old school feel ;) It was a real quickie. Within 20-30 mins and voila!
The best part is, you can customize it however you want it.
I know the cover of the book isugly boring and super rather embarrassing but there is a way where you can jazz it up and it will look cool. Vintage even! like old school classic but awesome at the same time.
So here is what you need. Just very simple basic materials. ;)

1
Just take your thick thread (you could use a thin one, it works fine. Just a little bit more tedious) and give it about the length of 80cm or so. Depending on how long you need it because you have to make a book mark from the thread.

It will look something like this. This is just a basic thing, you can alter the process as you see fit. Different colour threads would be something fun and funky. So it's up to you how far you want to go ;)
2
Secondly, it's time to measure theugly part that has your school name, pattern, logo etc
Just measure enough to cover everything printed. Like mine, I have a border so I just measured the breadth and width to cover the borders.

choose your weapon of choice. You can cut it or you can slice it. haha. After having your measurements, make markings on your brown paper and cut it to size. Make 2 sets because you have to cover the front and the back as well.

I don't know why the image won't upload the right orientation -_-. Anyway, after you cut the brown paper, apply glue to the designated area. (area to be glued with the brown paper)
You can use spray mount to get a smoother and cleaner finish. Just remember to apply it on the brown paper and not the book unless you are covering the whole cover.
But since this is a quickie and a small project, a normal glue would do. =)

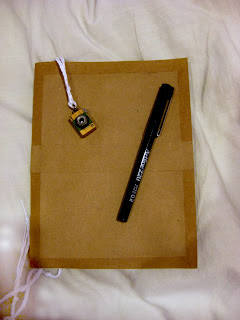
After applying the glue, just stick it on! =)
We're almost done! With what ever left over paper, you can create pattern and stick on it. Mine, I just created a band across the book to make it look bounded. It isn't obvious because I'm using back whatever leftover brown paper. But there is different layer so some texture is there.
3
Last part! Making the book mark. Simplest of all.
Since you have your thread done, all you have to do is string the key chain in and adjust the location. I chose mine roughly around the middle because of the way I want my book mark to hang when I close the book.


There you go, a new customize bookmark!
4
Take small piece of folded paper, write the name of the owner of this book ( whether its you or your friend) and inside write a short message. =)
It's sort of like a welcoming message every time you open it.


The first few pages or last page could be filled with some meaningful and inspiring quotes. I put it in the last page.

So yeah, that is about it. Very few simple steps. Yes it looks simple, may be a tad boring but you can always add to it to spice it up. Just something I felt like sharing ;)
xoxo!
I did this a couple of weeks ago, I was bored with school work so I found this old exercise book with some words scribbled inside and I decided to turn it into a diary! Just a clean, simple, nature inspired colour diary. Some old school feel ;) It was a real quickie. Within 20-30 mins and voila!
The best part is, you can customize it however you want it.

I know the cover of the book is
So here is what you need. Just very simple basic materials. ;)

1
Just take your thick thread (you could use a thin one, it works fine. Just a little bit more tedious) and give it about the length of 80cm or so. Depending on how long you need it because you have to make a book mark from the thread.

Make 3 sets of thread. Each sets has 3 threads just as shown above. Tie a knot just like the below picture so that you have the thread in place. Reason why you have 3 threads in one set, is so you would have a thicker texture and you can see the pattern clearly.
Braid them and after a certain length, say about 10cm, tie a knot to end it and start braiding again. Repeat this process until you've reach the end. This is to secure your braid and also to give it a little pattern.
 |
| knot |
 |
| braid texture. clear pattern |
If you think just the braid and knot is boring you can add beads of your choice. Just slip it in, into on of the sets of thread or just the whole thing, tie a knot to secure it if you have to.
 |
| end product |
2
Secondly, it's time to measure the
Just measure enough to cover everything printed. Like mine, I have a border so I just measured the breadth and width to cover the borders.

 |

I don't know why the image won't upload the right orientation -_-. Anyway, after you cut the brown paper, apply glue to the designated area. (area to be glued with the brown paper)
You can use spray mount to get a smoother and cleaner finish. Just remember to apply it on the brown paper and not the book unless you are covering the whole cover.
But since this is a quickie and a small project, a normal glue would do. =)

After applying the glue, just stick it on! =)
We're almost done! With what ever left over paper, you can create pattern and stick on it. Mine, I just created a band across the book to make it look bounded. It isn't obvious because I'm using back whatever leftover brown paper. But there is different layer so some texture is there.
3
Last part! Making the book mark. Simplest of all.
Since you have your thread done, all you have to do is string the key chain in and adjust the location. I chose mine roughly around the middle because of the way I want my book mark to hang when I close the book.


 |
| end product |

There you go, a new customize bookmark!
4
Take small piece of folded paper, write the name of the owner of this book ( whether its you or your friend) and inside write a short message. =)
It's sort of like a welcoming message every time you open it.


The first few pages or last page could be filled with some meaningful and inspiring quotes. I put it in the last page.

So yeah, that is about it. Very few simple steps. Yes it looks simple, may be a tad boring but you can always add to it to spice it up. Just something I felt like sharing ;)
xoxo!
Comments